Getting Started
Installation
-
Download the latest model from the Roblox Creator Store or the
control-hints-creator-store-model.rbxmfile from the GitHub repository. -
Insert the model into Roblox Studio and ungroup the folders. Check:
- The ModuleScript
ControlHintsshould be inReplicatedStorage. - The LocalScript
ControlHintsManagershould be inStarterGui.
- The ModuleScript
-
Create a Folder in
StarterPlayer → StarterPlayerScriptsto contain your Input Action System. See the Basic IAS Setup section for an example. -
In the LocalScript
ControlHintsManager, update the constantIAS_SETUPto reference your new folder: -
Control Hints should now be working when you test your game. See UI Styling next.
Basic IAS Setup
Organize your IAS setup folder like this:
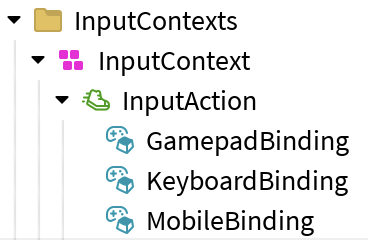
Control Hints uses the standard IAS setup, which is InputContext → InputAction → InputBinding.
Naming
InputActions
By default, the name of the InputAction is what will be displayed in the UI. You can change this behavior by setting a CustomName attribute (string) to the InputAction.
InputBindings
InputBindings show on different platforms depending on the start of their name:
- Names starting with
Keyboard→ shown on PC - Names starting with
Gamepad→ shown on console - Names starting with
Mobile→ shown on touch devices
UI Styling
Edit the Settings ModuleScript (under Configuration in the main module) to choose:
ICON_SET(default: Kenney) to change the look of control hint icons.DISPLAY_STYLE(default: Classic) to change the look of the UI.
-- Select a Control Hints icon set
Settings.ICON_SET = require(IconSets.Kenney)


-- Select a Control Hints display style
Settings.DISPLAY_STYLE = DisplayStyles.Classic
See Customization for more information on styling.